This is a fairly simple bell system C++ daemon, which reads an XML file, and PHP web UI, which can create the XML file. The daemon has three options for turning bells on or off:
- Set one of the pins of a serial connector to high
- Set a GPIO pin high
- Execute a command
Features:
- Create any number of named schedules
- Set a default schedule for each day of the week (or none, e.g. on weekends)
- Set quiet periods where no bells will ring (e.g. on holidays or break)
- Set override schedules (e.g. a half day or a special event on a particular day)
- Backup and restore
Depends: glibc, libxml++
First, put Raspbian on an SD card and boot up your Raspberry Pi. See the Raspberry Pi website.
Second, boot it up and adjust a couple settings. Default user is "pi" and
password is "raspberry". Run sudo raspi-config, then:
- Enable SSH access if you wish. Interfacing Options --> SSH --> Enable. Make sure you change the password before you do this if you want any sort of security.
- Also, you probably want to set the timezone, under Localisation --> Change Timezone. Otherwise all your times in the config file and website UI have to be in UTC.
Third, you can set up the bell system.
sudo apt install libglibmm-2.4-dev libxml++2.6-dev apache2 libapache2-mod-php php-xml git
git clone https://github.com/floft/BellSystem
cd BellSystem
make
sudo make PREFIX=/usr install
sudo systemctl enable bellsystem
sudo systemctl start bellsystem
To setup the website with Apache:
sudo unlink /etc/apache2/sites-enabled/000-default.conf
sudo ln -s /etc/apache2/sites-{available,enabled}/httpd-bellsystem-root.conf
sudo systemctl restart apache2
Finally, you need to:
- Run
sudo bellsystem-passwordto change the website user interface password. - Manually change the device location, GPIO pin, or command you want to run in /usr/share/webapps/bellsystem/config.xml since those you can't change from the website for security.
- Follow the schedule setup below to set up the bell schedule. Make sure to change the school start/end or else it'll never ring.
That's it! Find the IP address of your Raspberry Pi and go to http://ipaddress in a web browser.
If you're interested in debugging serial, you might build the "serial.out" test which alternates setting the voltage on serial high and low every 3 seconds. You probably want pins 5 (ground) and 7 (RTS, changed between high/low voltage).
make tests
./daemon/test/serial.out
To upgrade (if desired):
cd Bellsystem
git pull
make
sudo make PREFIX=/usr install
sudo systemctl daemon-reload
sudo systemctl restart bellsystem apache2
To uninstall (note that this deletes your config file and website password file):
sudo systemctl disable bellsystem
sudo systemctl stop bellsystem
sudo unlink /etc/apache2/sites-enabled/httpd-bellsystem-root.conf
cd BellSystem
sudo make PREFIX=/usr uninstall
You have three options for controlling the bell:
- write to a serial port or a usb-to-serial converter that is connected to a triac circuit powering the actual bell
- set GPIO pins high
- execute a command
If using the first option, you need a circuit that will turn on and off the bell when the voltage on one of the pins of a serial connector (or usb-to-serial-converter) goes from low to high.
The second option is probably the most ideal. A number of people using this software are using this method.
The third option basically let's you do any other method you'd like. Just write a script or program to ring the bell by some method and it'll run that program at the desired times.
My setup: I used a triac (SSRAC112), a usb-to-serial adapter (lots of options), a switch, fuse, etc. Then I wired the bell to the SSRAC112 load, the wall power (from a 24V power supply for the bell) to AC in, and the usb-to-serial pins 5 and 7 (5 is ground, 7 is RTS, which switches between high/low voltages) to V in.
Note: You want to make sure the clock is right, but Raspbian installs ntp by default.
The Web UI is an optional method to modify the config file for those who don't want to modify the XML code directly. If you just installed the software on a computer, be sure to read the first two sections below.
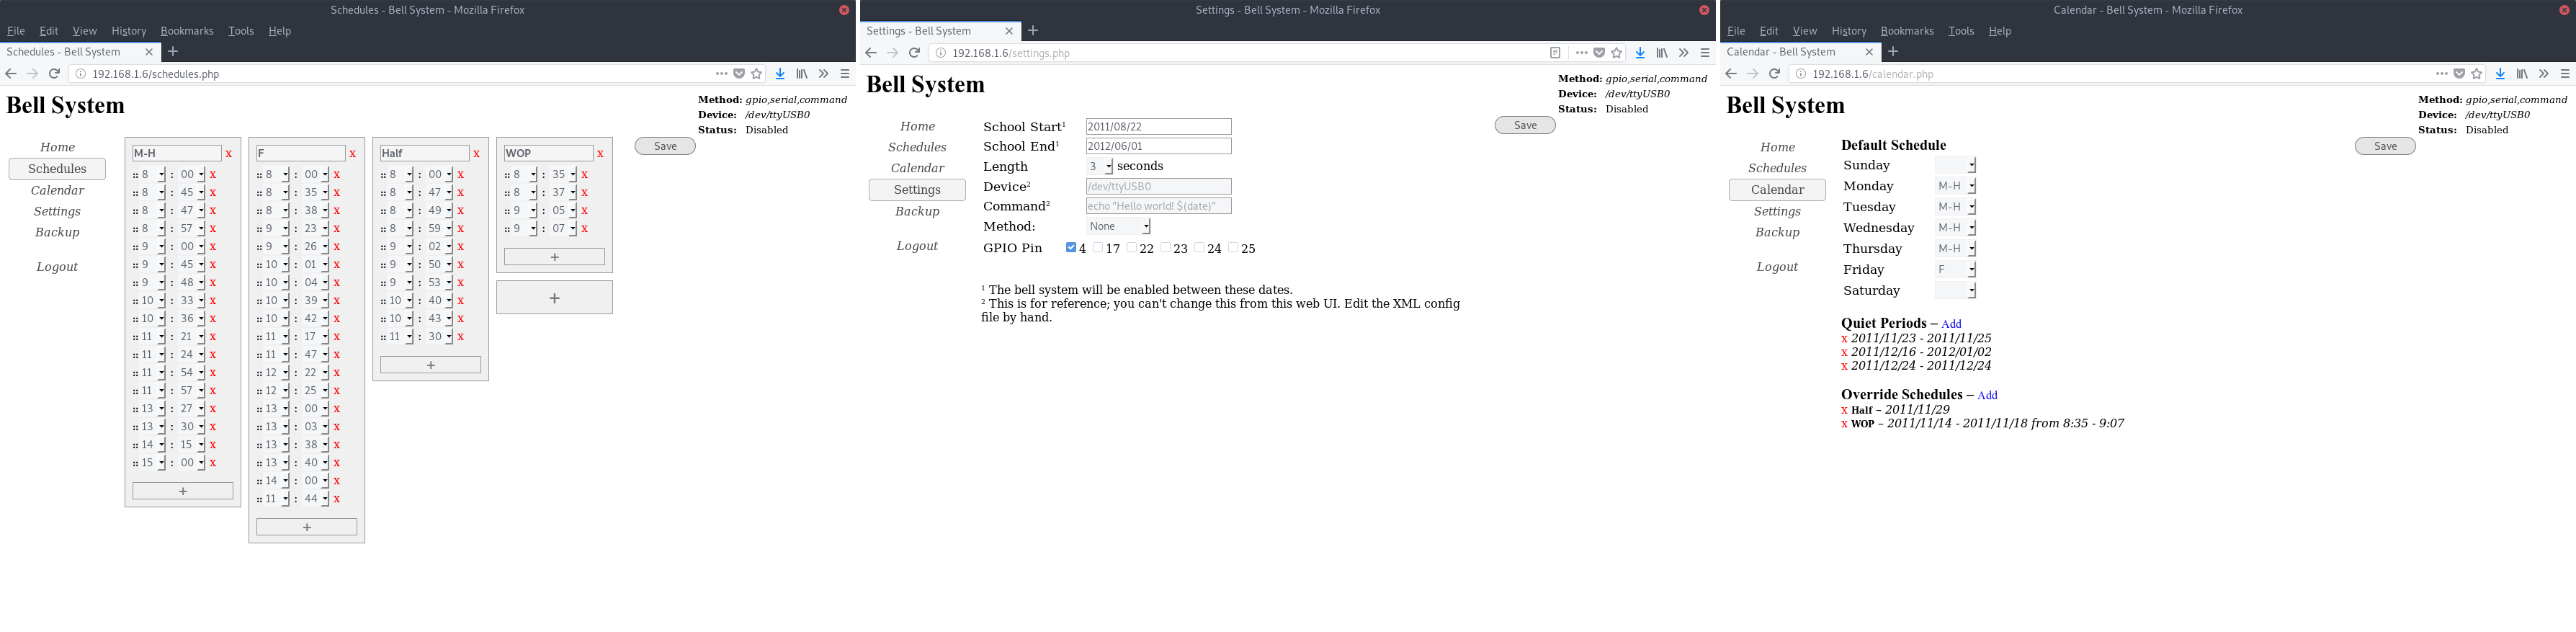
Go to the Schedules page and click the + button to add a new schedule. Type in a name for the schedule (used to identify it on the Calendar page) in the text box. Click the + button below the text box to add a first time. Click the button again for a second time. If you want to reorder the times, drag the :: on the left side of the time up or down. If you want to delete a time, click the red "x" next to it. If you want to delete a schedule, click the red "x" next to the text box. When you are done creating the schedule, click the Save button on the right side of the page.
Note: Times are displayed and stored in 24-hour local time.
Go to the Calendar page and choose what days you want this to be the default schedule by selecting it in the drop down box next to the days of the week. If you want it to be the default schedule on Wednesday, select it in the drop down box next to Wednesday.
Still on the calendar page are two other sections: Quiet Periods and Override Schedules. If you want to have the bells not ring for a day, click the Add link next to "Quiet Periods" and click on the new item created. Select the start date for when to start not ringing. If this is a single day, only set the start date. If this is for more than a day, also set the end date. If this is for a certain period of time during a day (or more), also set the Start time and End time to the right. By default the bell will not ring from 0:00 to 23:59 (the entire day) during the range or single date you select. If you only want it to not ring between 7:00 and 7:30, set those to be the start and end times during the day or days you wish. The process is the same for adding Overriding schedules such as a half day. Click add and click the new item. With override schedules, you will also have to specify what schedule to use on the day/days you specify. To delete any of these calendar items, click the red "x" to the left. To reorder them, drag them up or down in the list. You cannot drag them between Quiet Periods and Override Schedules.
Before your bell system will actually ring, you need to set when school starts and ends by going to the Settings page. Click on the text box next to "School Start" to bring up a calendar. Choose the day when school starts and do likewise for the day school ends. The bell will only ring between these two dates.
Note: These dates include years. Don't forget to set them to the correct year.
Also change the length of the ring in seconds to anywhere between 1 and 10 seconds. The default is 3 seconds. If you need to change this to over 10 seconds, you will need to modify the constants in the PHP code for the Web UI and the C++ code for the daemon.
Occasionally, you will want to backup the bell system settings, schedules, and calendar. To download a backup, go to the Backup page and click "Download Config." Save this file somewhere. If you ever need to return to this revision, just go back to the Backup page and select this file under Restore and click "Save" to restore it.
To change the password for the Web UI, you need to run sudo bellsystem-password again. To change the password for the Linux user run sudo passwd username (on Raspbian the username is probably "pi").
You can try running sudo chown www-data /usr/share/webapps/bellsystem/config.xml to change ownership of the config file. You need to do this if you ever manually replace the file, which might have caused the user to change. They should both be what apache is running PHP as (on Raspbian this appears to be "www-data", on Arch Linux ARM this is user "http" and group "http").
If you choose not to use the Web UI, you can modify the config.xml file directly. An example config file is available in the directory you installed from or on Github. There are three sections to the XML file: settings, calendar, and schedules.
These elements should be specified:
- length - The length in seconds that the bell will ring. It must be between 1 and 10; otherwise, modify the C++ daemon.
- device - This should be either /dev/ttyUSB0 or /dev/ttyACM0 for a USB-to-Serial converter or something like /dev/ttyS0 or /dev/ttyAMA0 for a serial port.
- method - This should have any of "gpio", "serial", or "command" separated by commas for the methods you wish to use to ring the bell. Note: presently you should have only one of these enabled since they won't all run at the same time.
- command - This is the command to execute when command mode is enabled.
- gpio_pin - This is the list of GPIO pins to set high when GPIO is enabled (e.g. when on a Raspberry Pi).
- start - The date that school starts and the bells [possibly] will start ringing. It must be in YYYYMMDD (e.g. 20111101).
- end - This is the date that school ends and the bells will stop ringing. It is in the same format.
There should be three elements:
- default - This should have seven exec elements each either blank or with the ID of a schedule that is the default on that day. The day first exec is Sunday, the second Monday, etc.
- quiet - This is a list of days when the bells will not ring. Format explained below.
- override - This is a list of when the default schedule will be overrided with another schedule. Format explained below.
A "when" is slightly different for the quiet and override items, but the text of it is the same. It can be:
- YYYYMMDD - a single day
- YYYYMMDD-YYYYMMDD - a range of days
- YYYYMMDDHHMM-YYYYMMDDHHMM - a range of days starting and ending at a certain time on the start and end days (this functionality is not available in the Web UI); the HHMM is two-digit hour followed by two-digit minute.
A when can have up to three attributes. If this is under override, it must have the "exec" attribute.
- exec - This is required for the override schedules. It is the ID of the schedule that will override the default during this date/time period.
- start - This is optional. It is the time during each of the days that will start being quiet or this override schedule.
- end - This is optional. It is the time during each of the days that will end being quiet or this override schedule.
Sometimes the YYYYMMDDHHMM and start/end attributes confuse people. (That's why the YYYYMMDDHHMM isn't available in the Web UI.) For example, for a quiet period, the YYYYMMDD0730-YYYYMMDD0830 would start not ringing at 7:30 on the first day and stop not ringing at 8:30 on the second day. A "start='7:30' end='8:30'" would stop the bell from ringing between 7:30 and 8:30 on each of the days during the days specified. Yes, these end up being identical if the range of days is a single day.
There could be any number of elements under this. Each one is a schedule element with two attributes:
- id - This is normally a number from 0-infinity (should work though even if it is a string). This is used to identify which schedule is the default on which days and which schedule is used to override the default schedule on certain days.
- name - This is just to help you. It's not really necessary, but it will/should give an error if not specified. It is more used in the Web UI.
Under each schedule element should be any number of time elements. These should be in the format H:MM or HH:MM (e.g. 8:00 and 12:35).
You don't really need the website UI. It is just there so that people who don't want to edit the config.xml file by hand can have a nice, pretty website to use.
If you restart the bell system daemon during a minute when the bell is supposed to ring, it will ring again since it checks if a bell should ring during this minute on start. Probably not worth fixing this since it's very rare, but be aware that this could happen.
These browsers are really old. Use a modern browser, e.g. Firefox, Chrome, Edge, ...
This is set up for Apache. It would also be easy to set it up for nginx, etc. Feel free to create a pull request.